 |
| A Raspberry Pi Pico board in my hand for scale. |
The Raspberry Pi Foundation has recently released a new product. It is called the Raspberry Pi Pico. Unlike other Raspberry Pi products to-date, this one is not a single-board computer running Linux that also includes GPIO pins that can control electronics. Rather, it is a microcontroller, more akin to an Arduino than its namesake cousins. But, that shouldn't reduce your excitement about the new product, in fact for me it enhanced it. The details about the product and its specs can be found at raspberrypi.org, so I'll not regurgitate them here. But, it is a very capable little device. And it retails for only $4 per unit! I ordered five to get started.
I received my Picos mid-week last week. I spent most of the next weekend working through the “Getting Started” book they provide in PDF form on their website. It is a pretty solid introduction into what can be done with the Pico and MicroPython.
First impressions, I amazed at how capable a device this little thing is. Here are a few things to be aware of if you are getting started.
- It comes without pin headers attached, so be prepared to solder your own on. And at $4 per unit, it doesn’t ship with headers, so you’ll have to reach into your own parts bin for those.
- It has support for both C/C++ and MicroPython development, but the Python toolchain appears more mature.
- All the documentation has you using the Thony IDE out the gate, which has support for the Pico in its latest version. If you prefer VS Code or PyCharm, you will need to do some additional work to easily work with your Pico. I use VS Code as my IDE so here are a few tips that made my life better:
- Install the Pico-Go extension to keep your code in synch with the Pico. It works pretty well.
- If you want IntelliSense (code completion) support for the MicroPython classes in VS Code, you’ll need to install Micropy . It is a CLI that eases the integration with the IDE, enabling MicroPython IntelliSense and giving the Linter the metadata it needs to help you. You need to execute it in your project folder, and all is better after that.
- You may also want to install some other command line utilities like Minicomm and RShell which will allow you to connect to the Pico outside of an IDE environment.
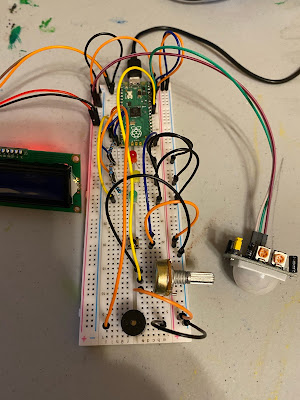
- The examples in the book aren’t bad. If you don’t have the exact components they use lying around, be prepared to modify their code somewhat. The good news is that it is easy to do. I didn’t have the same Adafruit LCD screen they used, I just had a generic 2 line 16 character LCD with an I2C backpack. It didn’t take too much googling to find this library on GitHub which allowed me to talk to the model I had using MicroPython.
 |
| Pi Pico mounted in a breadboard driving multiple components |
All and all, I had a great time experimenting with the Pico this weekend. I’m looking forward to incorporating it into projects in the future.


No comments:
Post a Comment