 |
| A vintage German Army Enigma Machine |
Regardless of the reasons why, I have developed a significant interest, some might even call it an obsession with this quirky little device. This post will be the first in a series of posts that one of my coworkers has encouraged me to to make describing my explorations of the Enigma.
Like many engineers, I tend to want to understand not only how a device is used, but how it works. I've never owned a computer for example that I've not completely disassembled in an effort to fully appreciate and understand its workings. Unfortunately Enigma machines are quite rare. The few that remain are in museums and private collections, and they typically do not tolerate curious engineers putting their oily hands on their priceless artifacts. So, how did I get my hands dirty with the Enigma?
Simulation
Searching around on the Internet, I found lots of sites providing detailed explanations of how the Enigma works. Some good places to start are:
As I mentioned above, the design of the Enigma is quite elegant, and easy to operate, but that design hides some significant complexity under the hood and inside the components. Visualizing its operation was hard for me from descriptions and photographs alone. I needed more.
I first sought out online simulators that emulated the use of an Enigma machine. Here are some of the best I found:
Those were very helpful in understanding how the machines were used, but were of little or no value in learning how the machines worked. And without that basic understanding, I had trouble understanding why the Germans used it the way they did, or why it was so challenging to defeat. I was looking in the wrong place. What I needed was a way to visualize the inner workings. I needed a model.
Modeling
Fortunately, the Internet could provide me with just what I needed. The first one I found helped a lot. It was the Paper Enigma Machine put together by a gentleman named Michael Koss. This simple paper-based simulator did a great job of helping me visualize the inner wiring of the rotors, and how they moved based on the physical setup of the machine. It was good, but it could only take me so far. It didn't model a plug board, or a way to adjust the ring setting, which I was also having difficulty visualizing.
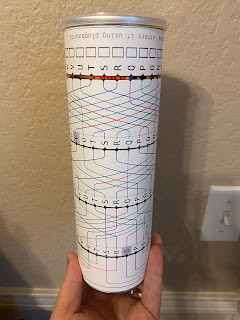
That led me to the Pringles Can Enigma Machine. This one is actually a complete, fully functioning, three rotor enigma with ring settings and a plug board if you so desire. If you'd like to see it in action, and a guide for constructing one of your own, see the video linked above, posted by Videos by Kevin on YouTube. If you'd prefer to just build it yourself without help, you can download the template here. One word of caution, the template is formatted for A4 paper. It is important that you not allow Adobe Acrobat to scale the PDF when it is printed. You must print it actual size for it to fit properly on your Pringles can.
 |
| My Pringles Can Enigma |
I hope you can see why this model helped me so much. It enabled me to follow the traces of the circuit, and to visualize how the movement of the rotors caused the mapping of the letters to shift. Finally, if you pardon the pun, the connections were made and the light came on for me, so to speak.
Next Steps
This understanding opened a world to me. Rather than sating my desire to learn more about the Enigma, learning how it worked drove me deeper into its world. I began reading, and now understanding, more about the device's use during the war. How the code breakers at Bletchley Park, like Alan Turning were forced to innovate with mechanical computing devices to defeat this simple little electrical circuit. I was even inspired to create my own versions of the Enigma machine, first based solely on software, but now I'm branching out into hardware replicas as well. Future articles will go into more detail on those.
I hope this explanation of my early journey to understanding the inner workings of the Enigma has made it less of an enigma to you.


